Sunday, November 27, 2011

Got Leftovers? Turkey Tetrazzini

In the good old days when my mom used to cook, she was a master at casseroles. What we now see as retro cooking is actually genius comfort food with a purpose. Casseroles can be made in advance, frozen, given as gifts to someone in need of a home cooked meal, and utilize ingredients that may have been another meal the evening before. Transforming things is a pleasant way of not wasting perfectly good food and bringing new joy to a meal. There is a reason Thanksgiving is only once a year and honestly who wants to eat the same thing several days in a row?

Turkey Tetrazzini is a myth to me. I have only heard about how my mom and other people always made it and I had never tasted it. People don't call Tetrazzini a casserole because of the connotations of what a casserole is in their memory banks. I however, would like to demystify making it and debunk the untruths that casseroles are passé. They remain lovely and comforting and can be given new life. If you show up at a friends with a homemade casserole and all they have to do is bake it, believe me, you will be remembered by that friend many years down the road. I don't know why our culture has gotten away from home cooking and sharing but I would much rather eat a small portion of home cooking than a pizza that tastes like cardboard any day!

I made a baked version of Eggplant Parmesan recently and it was one of the greatest meals ever. I would happily show up to my best friends house with it and enjoy a glass of wine with her family while it baked. Knowing what goes in your food is important. I read an article recently that said our country as a whole is 20 lbs heavier than it was 20 years ago. This is exactly the time when coffee joints started popping up offering drinks that are loaded with calories, people got away from cooking at home, and fast food meant sacrificing flavor and actually isn't any quicker when you think about drive time or waiting for the delivery guy who may have let your pizza fall to the floor while he was texting his buddy about what he is doing later.

Get in the kitchen! Grow what you can at home! Don't make excuses for how busy you are or how you don't have the space for a garden. I grew an enormous amount of tomatoes and an herb garden on a condo balcony. The whole project cost me less than $20 and the product return was incredible. I probably would have spent four times that at the store for the heirloom tomatoes and fresh herbs that I was able to cultivate and I knew what was in the soil.

Turkey Tetrazzini

3-4 cups Pasta, any kind of noodle you like. I used Rotini
2-3 cups mushrooms, sliced
1 1/2 cups broccoli, fresh
3/4 cup frozen sweet peas
3 cups turkey, chopped into 1 inch pieces
8 T butter divided
1/4 cup AP flour
1 1/2 cups whole milk, organic
1/4 cup cream
2 cups chicken broth
1/4 cup cooking sherry
1/3 cup shredded Swiss or other white cheese
2/3 cup shredded Parmesan or other Italian cheese, divided in half
1/2 cup panko breadcrumbs
Juice and zest of 1/2 lemon
1 tsp paprika
1/4 tsp nutmeg
2 sprigs fresh thyme
Good salt and pepper TT

Preheat the oven to 375 degrees F.

Cook the pasta is boiling salted water for half the time you normally would. Drain and set aside. You want it very al dente since it will continue cooking after you drain it and when you bake it.
Sauté the mushrooms in 2 T butter until nicely browned and then add a splash of sherry and the thyme. Set aside.
Make a roux with 4 T butter and the flour over medium heat whisking constantly 3-5 minutes or until golden brown and the flour is cooked. Slowly add in the milk and cream whisking to avoid lumps. Add in the broth and sherry. Cook for 8-10 minutes stirring constantly. Add in the Swiss and half the Parmesan, lemon juice, zest, nutmeg and then check for seasoning S&P.
In a large bowl, mix the pasta, turkey, mushrooms, raw broccoli and frozen peas. Pour the sauce over it and combine. Pour into a large casserole dish.
Melt the last 2 T butter.
Mix the breadcrumbs, the other half of the Parmesan, and paprika and sprinkle over the casserole. Drizzle with melted butter and take it to a friends house now or bake for 30 minutes or until the top is golden and the sauce is bubbling.

Thursday, November 24, 2011

Thanksgiving: Heirloom Quinoa With Asparagus and Mushrooms


On my trip to New York recently, my buddy Josh was practicing his cooking skills and made a Turkey dinner. One of the side dishes he served was Quinoa and Asparagus. Quinoa (pronounced, Keen-Wah) is one of my favorite grains. I often make Quinoa Cakes, a vegetarian dish that I discovered at Whole Foods about ten years ago. It is a pleasant alternative to rice as a side dish and can be made many ways. The version I most often find in the store is a light colored grain. The Heirloom Black variety, I came across at Williams-Sonoma. It has a little more bite to it and the color difference is stunning. In my Thanksgiving meal I added Asparagus and three varieties of mushrooms, Oyster, Shitake, and Baby Bella. It was my favorite side dish and can be made year round with any meal.


Heirloom Quinoa with Asparagus and Mushrooms

1 cup Black Heirloom Quinoa
3 cups water or chicken broth
1 shallot, chopped
2 garlic cloves, chopped
1 1/2 cups cleaned mushrooms, Oyster, Shitake, Baby Bellas, sliced
1 bunch skinny asparagus, 1 1/2 inch pieces
Salt and Pepper TT
1 T each butter and oil

Rinse the quinoa well under cold water. Place the quinoa and broth or water in a small pot, bring to a boil then reduce the heat to simmer for 20-25 minutes. Set aside and allow to rest. Heat a saute pan and add the butter and oil. Saute the shallots and garlic for 1-2 minutes. Add in the mushrooms and cook on medium low heat. Bring the heat up to medium and add the asparagus. Cook until tender but do not overcook. Salt and pepper to taste. Add the quinoa and toss it all together. Serve warm.

Thanksgiving: Corn Souffle


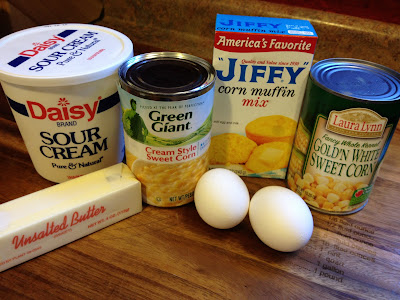
I was surprised when my father asked me to make a corn souffle. I have never heard him mention it in all the many years I have been making Thanksgiving meals. Honestly, I didn't think I would like it and the recipes called for canned and boxed ingredients. Considering I was making Twinkie stuffing, I thought this was cheating again and lost the battle when we were grocery shopping and he picked up all the ingredients for it. It turned out great and made a wonderful addition to our meal. I might make it again but a more complicated, fresh version so I have some personal satisfaction as a chef. The recipe is quick and easy and bakes in about 30 minutes. I served it warm. He enjoyed it so that is success to me.

Corn Souffle

1 package Jiffy Cornbread mix
1 can Corn, whole, drained
1 can Creamed Style Corn
1 stick Butter, melted
1 cup Sour Cream
2 Eggs

Mix all ingredients together and pour into a greased baking dish. Bake at 350 for about 30 minutes.

Thanksgiving: Twinkie Stuffing With Cranberries


Twinkie Stuffing!!??! Yep! I made it. I did add my own twist on the recipe as usual and the result was amazing. I would make it again and again. I was surprised by the outcome especially considering I wanted to make it as a humorous element to my Thanksgiving day feast. The original recipe seemed bland to me and with the addition of dried cranberries and roasted peeled chestnuts, there was texture and the sweetness needed to complete the meal without having to make cranberry sauce which is not one of my favorite things. I always bake my stuffing separate and this is an easy recipe if you make the cornbread muffins a day ahead of time. This delicious dish will be a conversation starter at your family feast!

Twinkie Stuffing

1 package Jiffy Cornbread Muffins, prepared according to box instructions
6 Twinkies,halved lengthwise, filling removed and reserved for Turkey Glaze
1 Granny Smith apple, peeled, cored, diced
1-2 T chopped herbs (same as your Turkey herbs)
1/2 cup dried cranberries
1 package roasted peeled chestnuts, chopped
1 stick of butter, melted
1 can chicken broth

Rough chop the Twinkies and Cornbread muffins. Mix in the apple, cranberries and chestnuts. Place the chopped herbs in the melted butter and add to the bread mixture. Pour in the chicken broth and gently mix. Place in a greased or parchment lined baking dish and bake at 350-375 until top is golden brown and stuffing is heated through.

Thanksgiving: Twinkling Citrus Turkey


Thanksgiving meals are easy and stress free for me. I started making them by myself when I was 15 years old and have learned a lot since then. Timing is everything. Knowing how long each item will take to prepare is key to having everything complete at the same time. No one wants cold mashed potatoes or to have to wait for the gravy. My advice for dessert is to make it a day ahead or to bake it while everyone is eating.

My most memorable Thanksgiving actually was the one year I didn't have turkey and my father and I went to Italy for 9 days. Finding a turkey dinner in Rome is a challenge and I didn't bother to look too hard. This Thanksgiving is memorable to me because I woke up and looked out of my kitchen window and saw eleven wild turkeys trotting across my yard. I often see them but usually in the late afternoon and never that close to the house. They are really beautiful.

Each year I stuff my turkey with lemons and oranges, herbs and shallots. I also always make it in an oven bag. The result is a moist turkey with flavor that is bright and delicious and you don't have to constantly baste it. This year I wanted to change it up a bit after I came across a recipe for Twinkling Turkey. Twinkie has a recipe book believe it or not, and I came across an online article about how you baste the turkey with a mixture of the cream filling and honey and the stuffing is made with the sponge cake. I don't stuff my turkey with stuffing because it takes so much longer to cook and I am scared of killing someone if it's not heated all the way through. The oranges and lemons impart a unique flavor and it's how I make a perfect turkey every year.


Twinkling Citrus Turkey

12-22 lb Turkey
2 oranges, zested and quartered
2 lemons, zested and halved
Salt and Pepper TT
Bunch of Fresh Rosemary, chopped
Bunch of Fresh Sage, chopped
Bunch of Fresh Thyme, chopped
2 Shalllots chopped
1 stick of butter, melted

Roasting Pan
Oven bag
1 T flour

For the Glaze
Cream filling from 6 Twinkies
1/4 cup honey
zest from 1 orange

Preheat the oven to 350 degrees F.
Remove the parts from the cavity and discard or set aside for giblet gravy. Rinse the entire turkey and cavity with cold water. Drain and pat dry with a paper towel. Salt and pepper the inside of the cavity generously. Mix together the chopped herbs, citrus zest, and shallots. Place some whole stems of herbs in the cavity and fill with oranges and lemons at both ends. Place herbs and zest under the skin and also cover the outside. Salt and pepper TT. Pour melted butter over the turkey and under the skin. Place 1 T of flour in the oven bag and arrange it on the roasting pan. Carefully transfer the turkey to the oven bag with the flour in it. Cute 4-5 slits in the top of the bag and cook in the oven until it's done. The last 15 or so minutes, check the temperature and cut open the bag. Mix the glaze and cover the turkey with it. Cook until golden brown. Remove the bird from the oven and allow to rest 20-30 min before carving.

Wednesday, November 23, 2011

Evening of Thanks

What a glorious time to be in Tennessee! We all have so much to be thankful for in our busy lives. This evening I would like to extend a special THANK YOU to my friends and crazy family. In what has proved to be an interesting year you have been so supportive during times of laughter, through tears, joy, elation, surprises and never-ending adventures! You bring smiles to my face daily and inspire me, for that I am forever thankful. I'm also thankful for the state of Tennessee for teaching me so much about life, love, and the land. Shoutout to my military friends who are serving or have served and their families for their sacrifice, for our well being.

Cheers to all of you! Wishing you lot's of turkey and memories that tomorrow brings. Enjoy the day and every day you have :)

I better get busy prepping this meal since I only have one good hand right now!

xoxo
Mandy in East Tennessee

Milk & Cookies: Vanilla Sugar Cookies

A good sugar cookie can make anyone's day better. I have used several recipes throughout the years and have a couple of favorites. There are a few secrets to making a delicious sugar cookie that is easy to roll and cut out. The first is time and chilling the dough. If you skip this step, your cookies will run at the sides and lose their shape which will make you a sad cookie. The second secret is the use of high quality ingredients and a little bit of citrus zest. I like orange, but lemon or lime also give a nice little zing to the cookies. You don't need much, but when you mix it into the sugar, it gives a freshness to an otherwise bland tasting dough. I love Vanilla Bean Paste! I use it in place of vanilla extract in all of my baking. The portion is equal but it's a bit thicker and has actual vanilla bean in it and transforms any recipe.

I came across a fun new toy, Message Cookie Cutters. Williams-Sonoma sells the set for about $20 and it comes with three cutters and alphabet sets so you can personalize your cookies with a message. You slide the letters into the cutters and viola, your sugar cookies are better than conversation hearts on Valentine's day!

The recipe included in the kit is pretty good if you add citrus zest and use vanilla bean paste.

A great sugar cookie doesn't always need icing but my friend Blair asked for a good icing recipe to use. Icing is another great way to dress up a cookie and personalize it for a special event or holiday. Blair writes a blog and is an amazingly creative event planner in Southern California! Blair Britt Events Blog, click here!

Vanilla Sugar Cookies

2 1/2 cups AP flour
1/2 tsp good salt
1 1/2 sticks unsalted butter, room temp
1 cup sugar
Zest 1/4 orange, or 1/2 lemon or lime
1 egg
1 1/2 tsp Vanilla Bean Paste

Sift together the flour and salt, set aside. Zest the citrus into the sugar in the bowl of an electric mixer with the paddle attachment. Add the butter and mix on medium until light and fluffy, scraping down the sides of the bowl. Add in the egg and vanilla bean paste and mix until light and fluffy. Add in the flour in two segments, mixing until just combined. Turn out the dough and form into two discs and wrap in plastic. Refrigerate for at least two hours. Roll out the dough using additional flour and cut into shapes. Chill the cutout cookies on a parchment lined sheet pan for 20-30 minutes in the fridge or 5 minutes in the freezer. Bake at 350 degrees F until the bottoms just start to turn golden, 12-15 minutes. let sit on the sheet pan for 5 minutes to cool before transferring to a cooling rack.

Sugar Cookie Icing

4 cups confectioners sugar
1/4 cup plus 1 T cream
1/2 cup unsalted butter, room temp
Pinch of good salt
1 1/2-2 tsp good vanilla

Beat all ingredients until smooth. Add gel color if desired. Icing will set up quickly. If this happens, place on a Bain Marie (double boiler) to soften, or in the microwave for 10 seconds.

Milk & Cookies: Pumpkin Spice

The holidays bring so many wonderful things. I have finally experienced a season change and watched the leaves go from green to the ground. The palm trees in California don't exactly change much and the scenery there is slow to change. With the chilly weather and naked trees it is easy to get into the holiday spirit this season.

I decided to make some cookies for a friend and came up with some new recipes! First up is the Pumpkin Spice Cookies. Using Pumpkin purée, and pumpkin pie spices, these wonderful sugar cookies can be cut into shapes and bake up beautifully. I also took some of the dough and added milk chocolate chips. I baked them as drop cookies and they turned out delicious!

Pumpkin Spice Cookies

2 1/4 cups AP flour
1/2 tsp baking powder
1/2 tsp good salt
2 tsp pumpkin pie spice
1 cup unsalted butter (2 sticks), softened
1 cup sugar
2 T brown sugar
1 egg
1 1/2 tsp good vanilla
1/4 cup pumpkin purée

Sift together the dry ingredients, flour, baking powder, salt, spices. In a mixer with the paddle attachment, cream together the butter and sugars until light and fluffy, about 3 minutes. Add in the egg and mix until incorporated. Add in the vanilla and pumpkin purée and mix until just combined. Slowly mix the dry ingredients until just combined. Do not over mix. Turn out the dough and form into two discs and wrap in plastic or parchment and chill until set. 2 hours or up to two days, also can be frozen for up to 3 weeks.

Roll out the dough using as much flour as necessary so it doesn't stick. This dough is more moist than some others. Cut out shapes using floured cookie cutters and bake at 350 degrees until slightly browned at the edges. Do not over bake.

The cookies can be decorated with a cream cheese icing glaze if desired or any icing you like. Mine were meant to travel and I thought they were great without icing.

Wednesday, November 16, 2011

Got Pie?


My BFF Katie emailed me asking for a good pie recipe to make for her "Friendly Thanksgiving". They are celebrating on Monday and while I'm bummed I can't be there, I know they will love this pie! It's my go-to favorite for the holidays and my old roommate had me make it on a random non-holiday and it was just as good. Celebration or not, you never need a reason to make a good pie, especially if Bourbon is involved. It can easily be doubled to share with friends and family and is good even if made a day or two ahead.

Chocolate Bourbon Pecan Pie

1 (9 inch) deep dish frozen pie shell (Buy it and lie about how you made the crust)
1 cup white sugar
1 cup light corn syrup
1/2 cup unsalted butter
4 eggs, beaten
1/4 cup bourbon, plus more for drinking :)
1 teaspoon vanilla extract
1/4 teaspoon good salt
1/2-3/4 cup milk chocolate chips or just enough to barely cover the bottom of the crust
1 cup chopped pecans

Preheat oven to 325 degrees F

In a small saucepan combine sugar, corn syrup, and butter. Cook over medium heat, stirring constantly, until butter melts and sugar dissolves. Cool slightly.

In a large bowl combine eggs, bourbon, vanilla, and salt. Mix well. Slowly pour sugar mixture into egg mixture, whisking constantly (It's what we call tempering the eggs. You don't want scrambled egg pecan pie). Stir in the pecans. Put the chocolate chips in the bottom of the crust. Pour mixture into pie shell that is on a foil or parchment lined sheet pan.

Bake in preheated oven for 50 to 55 minutes, or until set and golden. (Shake the pan to see if the middle jiggles...) May be served warm or chilled.

Saturday, November 12, 2011

Milk & Cookies: Nutella Chocolate Chip


Growing up I had a British nanny named Sarah, for a short period of time. She introduced me to several wonderful things. She let me have a pet mouse which I likely named Joey as I named every pet I "found" Joey, up until the turtle I brought home later in life turned out to be a snapping turtle named Joey who showed me why I should have left him at the golf course in Georgia.

Sarah also bought me Nutella. Nutella is a chocolate hazelnut spread that I used to eat on toast for breakfast. It is a very versatile ingredient I have learned over the years. It's delicious served in crepes with bananas, on pancakes, in a sandwich, using wonton wrappers and deep fried it makes an amazing dessert ravioli. Today I decided to try it in a cookie.

Monique my BFF was baking my favorite cookie recipe, "Peanut Blossoms" which eventually inspired my peanut butter chocolate chip cookies. You can find my recipe here: Milk & Cookies. She sent me a photo and then I wanted one. Instead of the wonderful peanut butter cookie topped with a Hershey's Kiss, I began to think I wanted a chocolate-chocolate chip cookie.

It's been a while since I have baked, so why not try to come up with a cookie recipe? I watched a Top Chef marathon recently and the Sesame Street muppets were on one of the episodes. Cookie Monster was inspiring as a Top Chef judge. He wanted Chocolate Chip Cookies and so I created my own challenge, coming up with a cookie without using a recipe. Sometimes, I am my only entertainment. I know what proportions seem to work and off I went. I opened my cupboard and realized I had Nutella! Fun! What follows is a recipe that was created this evening in my Tennessee kitchen.


Nutella Chocolate Chip Cookies

10 T Butter or 1 stick plus 2 T, softened
1 cup Sugar
1/2 tsp Vanilla
1 Egg
3 T Nutella
1 1/3 cups AP Flour
1/4 cup Cocoa Powder
1/2 tsp Baking Soda
1/4 tsp good Salt
1/4 cup or more Milk Chocolate and or White Chocolate Chips
Raw Sugar for garnish

Cream together the butter and sugar until light and fluffy. Add the vanilla and egg and beat until light and fluffy. Add in Nutella and continue to mix until well combined, scraping down the sides of the mixer if necessary. Add in the dry ingredients and mix until just combined. With a spatula, stir in the chocolate chips by hand. Turn the dough out onto a piece of parchment or wax paper and roll into a log. Refrigerate for 2 hours or place in the freezer for 20-30 minutes. Preheat oven to 350 degrees F. Slice circles of dough and form into balls or use a portion scoop. Roll dough balls in raw sugar and place on parchment or Silpat lined baking sheet. Bake 10-13 minutes (or more depending on the size) or until they look done. Cookies will be soft. Allow the cookies to sit on the baking sheet for 1-2 min before transferring to a wire rack to cool. Enjoy with milk, or a nice Port or Sherry and some friends.

Wednesday, November 2, 2011

Lump Crab Ravioli: Crabioli


When I made my shopping list this week it included, Lobster, Lamb, Crab, Scallops, and Chicken. It has been a while since I have made ravioli and cheese ravioli sounded good to me. My father had another idea; Crab Ravioli. This is something I have never made before. I have used lobster and seasonal vegetables and cheese and spinach but it never crossed my mind to use lump crab meat in that application. So as per usual with me, I set out to make it delicious and without a recipe. I work much better without directions or other peoples ideas.

Pasta and ravioli in particular are time consuming tasks. I got off the hook for building shelves today because Uncle Bob came over and saved the day. I got to work in the kitchen. I used my own pasta recipe and then figured out what I had on hand that would go well with crab. I decided against a tomato based sauce as I think it holds up well to beef but unless it's almost broth like, it tends to overwhelm fish and seafood dishes. I made a creamy herbed white sauce, although it's very rich. I think a nice lemon and brown butter sauce would be just as nice.

Put on some music and your cutest apron and get to work. Today was a Best Of Carly Simon day for me while wearing my adorable cupcake apron that was sent to me by Rosemary. It's functional and flattering. As long as you feel like you look good while cooking, it makes the work seem like nothing. Always be presentable because you never know who might stop by.

Fresh Pasta

2 cups AP Flour
2 whole eggs
2 egg yolks
pinch of salt
2 tsp good olive oil

Pile the flour on a board. Making a well in the center of the flour add the eggs, salt, and olive oil. Mix in using a fork and then knead with your hands for about 6 minutes or until the dough is shiny. Form into two discs and wrap in plastic. Allow the pasta to rest for 45 minutes. Then using additional flour roll out the sheets.

Crabioli Filling

1/2 cup high quality Lump Crab (nothing from a can that's not in a refrigerated section of the store)
1/4 cup ricotta cheese
2 T fresh grated Italian cheese, Parmesan etc.
2-3 sage leaves
1 sprig fresh thyme
1/4 sweet onion chopped fine
zest 1/2 lemon
Pepper TT
Lemon Juice TT

Saute the onion until soft and then add the chopped herbs. Remove from heat and allow to cool. Transfer to a bowl. Mix in the cheeses, zest, and pepper using a fork. Gently mix in the crab and taste for seasoning. Add a few drops of lemon juice if desired.

Fill the ravioli with the crabby mixture and brush the edges of the bottom sheet of pasta with egg wash. Cover with the top sheet and press around the filling so there are no air bubbles. Cut and flour the raviolis so they do not stick to each other. Gently place in salted boiling water and cook for 3-4 minutes. Drain and top with your creative sauce and garnish with cheese, lemons, and some fresh chopped herbs. Recipe yields lots of ravioli. Finds some friends and enjoy with a great white wine!
xoxo

Grilled Lamb With Rosemary Roasted Red Potatoes


Tennessee is not like other places. I have written about how it's impossible to find pita bread, yet rabbit and frog legs are readily available. When my Aunt Toots was visiting, she and my father decided they were going to make a yogurt marinated leg of lamb. Lamb and pita bread are apparently from the same mediterranean cuisines that East Tennessee is neither fond of or familiar with. The grocery stores and local awesome butcher do not carry lamb. They were guided to another local farm where "you can get anything". They set off on an adventure to find the place which itself proved to be a challenge.

When they arrived, I'm told they were greeted by a man who would butcher basically any animal on the farm. They asked about lamb and instead were offered goat and were told it's easier for him to offer them leg of pony than a leg of lamb. I'd like to think the guy was kidding. My dad then said, "What about the llama over there?" The farmer replied, "Oh No! That's the Dolly Llama, no one touches the Dolly Llama."

I suggested they shop online for what they want. Instead, they discovered Sam's Club sells lamb. After several days of hunting, they finally found the prized meat. My Aunt butterflied it, marinated it and grilled it. They were quite happy.


I decided to make my own version with a simple marinade and some oven roasted red potatoes.

Rosemary Roasted Red Potatoes

5-6 medium red potatoes
2 sprigs fresh rosemary, chopped
2 sprigs fresh thyme, chopped
Garlic powder TT
Onion Powder TT
Good Salt & Pepper TT
Olive Oil

Preheat the oven to 375 degrees F. Wash and cut the potatoes into uniform bite size pieces. Soak in a bowl of cold water for 10 minutes or longer. Rinse and pat dry.
Place the potatoes on a parchment lined sheet pan for easy clean up. Sprinkle with herbs and spices then drizzle with olive oil. Mix them up to ensure they are well coated. Bake for 25 minutes and then stir the potatoes around. Increase the oven temperature to 425 degrees F. Continue roasting until potatoes are nicely browned, stirring them around occasionally, about 25 minutes. You could use fresh garlic or onions but they have a tendency to burn in the hot oven and become bitter since the potatoes take so long to roast.

Grilled Leg of Lamb

1 leg of lamb, butterflied
3 garlic cloves, chopped
2 sprigs fresh rosemary, chopped
2 sprigs fresh thyme, chopped
1/4 cup olive oil
Splash of white wine
Good Salt & Pepper TT

Rinse and pat dry the lamb. Mix all of the ingredients in a bag or dish and cover the lamb. Allow to marinate in the fridge for at least 2 hours. Remove from the fridge about 20 minutes before you are ready to grill it. Grill over high heat to desired doneness then allow to rest for 8-10 minutes before slicing. Serve with Roasted Potatoes and Mint Jelly if desired.

Tuesday, November 1, 2011

Girl Meets Lightbulb

By all accounts I'm considered a bright girl. It's possible that I have been considered "above average" intelligence. Today I proved the anthesis not only to myself but to my father as well. For months, I have mentioned that the lightbulb above my bathtub was burned out. We were at Home Depot a few weeks ago and my father mentioned that I should grab a lightbulb to replace it. I knew it was a Floodlight as my knowledge of lightbulbs is quite extensive having worked for a company where we did lightbulb checks daily and I was several times sent on a scavenger hunt for illusive bulbs at Light Bulbs Etc. Problem being that when given so many options in the lighting department at Home Depot, I realized I didn't know what size it was. For future reference, floodlights come in many sizes.

A week ago at another store, we again came across floodlights and I still hadn't paid attention to the size. I made it a point when I got home to check on it. I again forgot about buying the bulbs until today. Then, for the third time, I had a run in with floodlights and finally knew what size to get. I figured that I should not change the bulb with the fixture turned on. I turned off my bathroom lights and turned on the the closest light which is just outside my bathroom door. It made the all too familiar sound of clink and pop and it was out. Great, another lightbulb to replace, and this one is housed behind glass and screws. This lightbulb thing is getting complicated.

I decided to replace the bathtub bulb with the lights on in the bathroom. What's the worst that can happen? A burn, a shock? I just wanted to have all of my lights working as I notice when a lightbulb is out and it tends to bother me. If I see a burned out bulb at a restaurant or several, I immediately know the business and management doesn't care. Lighting is something that is so important, especially in a restaurant. If they don't care to change the bulbs, what else are they not keeping up with?

I unscrewed the bulb and replaced it. I was neither burned nor shocked. The bulb didn't work. I then assumed it must be a problem with the fixture. I know how to replace a fixture in a lamp and have installed a chandelier without assistance. I have amazing skills when it comes to not wanting to hire someone to do everything for me. I am quite capable of making things function. Fixing a recessed light fixture is above my talents though, and it's not going to make it to my to-do list. I tried turning off the lights and turning them back on thinking it would help. Then I tried the fan switch and that was a fail as well.

I looked down defeated. Then I noticed something I haven't seen before. A light switch on the wall of the alcove where the bathtub is located. Yep, youbetcha! That switch when flipped to the on position makes the light above the bathtub work. This means that not only was the original lightbulb not burned out, but it has it's own glorious controls to where my lighting can be just over the bath. It was not my brightest moment. On the flip side, I did replace the fully functioning bulb with an energy efficient bulb thereby saving the world. Maybe I am still a smart girl after all.